
This winter I noticed my Tacx Genius growing louder and louder until it eventually became such a nuisance that I contacted Tacx support. As it turns out, Tacx trainers have a tendency to become very loud over time. The trainer’s colic protest is due to the fact that the small roller is not a piece of solid metal, but rather a thin sleeve that is wrapped around a urethane core. 12 holes in the sleeve keep the metal sleeve connected to the core – much like the old dot-matrix printers that used paper with a tractor-feed along the sides. Over time, this “tractor-feed” begins to wear when the temperatures of the metal cause expansion and the urethane heats up causing the tractor-feed to lose it’s grip on the metal sleeve.
This has been a known issue for more than 8 years when Tacx began making turbo trainers with the tractor-fed metal sleeve design. To diagnose my trainer, I learned that a relatively quiet Tacx trainer can produce upwards of 88db @ 55kph if inflicted with the disease. After downloading a sound level app on my phone, my fears were confirmed as my Tacx Genius had it bad: 100db max, 92db average, and soft-pedaling uphill still produced a horrific minimal noise level of 86db. Very bad indeed.
Why Tacx continues to employ this system is outside the scope of this article. I contacted Tacx and they immediately understood the problem and said the issue would be covered under warranty. Great! Just a quick visit to my nearest Tacx dealer would steer me onto quieter virtual roads! When the dealer contacted Tacx to process the warranty, however, they said the warranty had expired for my 2.5 year-old Tacx Genius but the replacement part is available for the bargain price of ~$400 (+ international shipping, duties, tax, and a month-long wait). Thanks to the Tacx user forum, a DIY option surfaced that might be a quick and cost-effective fix.
The original solution was posted back in 2008, many years before the Genius was released, and it worked well for the Tacx Fortius in which the tractor-feed plugs wear down to almost nothing – allowing the metal sleeve to freely rotate around the core. A user from Leeds in the UK using the screen name of “Techno” is often credited for dreaming up the (now famous) remedy known as “The Epoxy Fix“. The repair involves drilling through the tractor-feed holes and refilling the plugs with a fresh infusion of epoxy. On the Genius, it’s not obvious that the tractor-feed is worn out. The sleeve does not rotate or rattle but it does appear that the sleeve or the urethane has been disfigured such that the sleeve shifts on the core as the tire rolls along. With the Genius, it almost feels that the urethane core has shrunk and the pocket of air between the metal and the plastic causes 1mm of movement. If you press your finger hard on the Genius roller, you can hear a faint “clunk” as the metal repositions itself. At 100+ revolutions per second, this innocent pin-drop noise explodes into a 100db Symphony of Destruction.
It’s a little daunting to drill through the heart of a very pricy indoor trainer, but once Tacx deemed my Genius a bastard child, I knew it was time to get dirty and venture into the dark alley of DIY. It is unclear if the Epoxy Fix is the medicine my Genius needs, but it certainly can’t hurt as 100db will ultimately lead to bigger problems, likely in the direct form of hearing loss not to mention indirect pain caused by aggravated family members or neighbors. While the forum thread covers all aspects of the repair, it does lack step-by-step photos which would have been helpful, especially to gauge the difficulty of the repair, so I’ll document the steps I took. I’m sure it will be of value to someone.
Step 1: Gather your materials.
– Grab Tacx’s flagship model, the Genius. The louder the better:

Tacx Genius
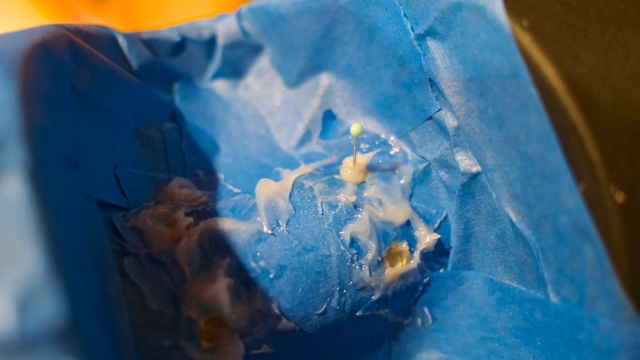
The focus here is on repairing the thin metal roller with small “tractor-feed” holes that allow it to grip the polyurethane core:

This is the “tractor-feed” or “polyurethane plugs” that help the sleeve grip the plastic core. On this Genius, the tractor-feed doesn’t look too bad, but there are some signs of wear:

Noisy Tacx, check. Tractor-feed wear or “click” when pressed with your thumb, check. Now you’ll need to locate some epoxy. The key here is to find one that works well with polyurethane, has at least a 15 minute work time, and will withstand some heat. Most of the epoxies I found at the hardware stores I visited were 1 minute and 5 minute versions. It took a few different stores, but eventually I found a 20 minute work time epoxy.
You will also need:
– A drill with 4mm bit (or 5/32″ bit)
– Some tape for keeping debris from getting inside the motor and resistance unit
– A toothpick
– A needle
– Safety measures to protect yourself from the epoxy which is nasty stuff (gloves, eye-protection, mask, and a well ventilated room that you can quarantine off for a day – the smell is something you’ll want to be able to escape from so a basement, garage, or workshop is recommended… try NOT to do this in your family’s kitchen or living area)
Step 2: Tape off all areas of the trainer with the exception of 4 holes (you can only work on 4 holes at a time, so you will need to break the process up into 3 parts to get to all 12 holes). The tape will help stabilize the roller and keep the epoxy from getting inside the trainer.

Step 3: Drill out the 4 holes with the 4mm (or 5/32″) bit. The plastic is soft and drills through easily. Continue until you feel resistance as the bit will eventually hit the metal axel.

Step 4: Apply the Epoxy
When adding the epoxy to the holes, I used a toothpick and a pin to apply. You can be as messy as you want and use the taped areas to scrape off access epoxy or to scrape more into the holes as needed. Use the needle and swirl the epoxy into the hole to ensure air is not trapped inside.
Step 5: Level off the epoxy, leaving it a fraction of a millimeter higher than the metal roller. It doesn’t have to be exact at this point.

Step 6: Wait 20-30 minutes.
Step 7: Remove the tape from the metal roller. The epoxy will be rather ugly and there might be some on parts of the metal sleeve which is fine. You can easily remove the epoxy with a rotary tool with a wire brush bit. In subsequent rounds, I learned it was best to keep the tape on the trainer’s black plastic body for this step to prevent debris from getting inside the trainer. You will definitely need to wear a mask for this step. This stuff oozes with nasty chemicals – such that one would almost expect to get cancer with longterm exposure.

Step 8: Finished! (This set). Remove all tape.

Step 9: Turn the roller and expose a new set of 4 holes and repeat the process (return to Step 2-8) until all 12 holes are complete.
Step 10: Wait at least 24 hours before riding. Enjoy the pain and misery of riding indoors with newfound appreciation and splendor.

First thank you for the very detailed post, I will attempt a repair on my unit that has the same problem.
Can you be a bit more specific on the type of epoxy you use (like Brand, …) as it is not really obvious which one to choose from.
Thanks
that’s good, thanks for sharing,.. I think this is great blog
hello there and thank you for your info – I have definitely picked up anything new from proper here. I did then again experience a few technical issues the usage of this site, since I skilled to reload the website many times prior to I could get it to load correctly. I have been brooding about if your web hosting is OK? Now not that I am complaining, but sluggish loading instances instances will often have an effect on your placement in google and could damage your high quality rating if ads and ***********|advertising|advertising|advertising and *********** with Adwords. Well I am adding this RSS to my email and can look out for a lot more of your respective interesting content. Ensure that you replace this again very soon..
so my Bushido Smart has developed this clicking sound and its getting increasingly louder as each ride is complete.. starts out quiet, clicks kick in once the roller heats up (and the metal expands). Sad, given the unit is 2 weeks shy of its first birthday and i have only ridden 1,200kms.. more or less. Im in Hong Kong and shipping the unit back to australia for repairs is not an option, even if under warranty. for a AU$900 unit, the build quality is disappointing. Thanks for the pics.. Im going to into surgery on it this weekend..
Thank you for another excellent post. Where else could anybody get that type of info in such a perfect way of writing? I’ve a presentation next week, and I’m on the look for such information.
Thank you Syteeta, glad to aid on your trainer fix. Comment to tell us how it worked out.
Just wondered how your fix is holding up? Have heard that the epoxy can break down again and some people recommend drilling, countersinking and putting in self tapping screws. It all seems like a lot of work though so I’m currently putting up with the noise!
I have a noisy Vortex Smart but I’m not sure if the noise is the same one this fix works for…lots of people are describing a clicking. This is mine https://drive.google.com/open?id=0B75QJLud8u3EQW5mOEw3d3FaVW8 – if this is the fix to this noise then can you let me know?
Teena, have you tried any fixes my noise is like yours.
Its rotor of electromagnetic brake\motor rubs against stator. U need to remove left cap (hold on latches) – unscrew internal cup on 3 short bolts, than u will see stator holded by 3 long torx bolts. U need to little loosen them, than in working state ( wheel on trainer) by rotating bike wheel u need find right position for the stator ( one long bolt for example will be screwed more than other two) . So screw bolts to find right position – u can find it just rock a littlr stator. Mu right position – front bolt tighten maximally – other two – minimally. But noice come back after some time, so i install some part of rubber between housing and stator on a back side (to lean stator to front) – no sound all the time now!)
full plastic housing lose form in time – so stator change position and rubs against rotor… Thats is a reason)
see answer for max brenes below
Teena Gade:
For me this sounds same as my Tacx Flow, which I successfully fixed by ‘epoxy fix’
On closer inspection my vortex their is not movement of the steel sleeve, but rust by each of the holes. Anyone think the superglue fix may resolve issue. The PU looks to be good, see no gaps in the hole.
I have exactly the same noise as Teena Gade. It is so loud now that I need to watch movies with subtitle.
I’ll see if I can manage the fix, knowing that tinkering is not my strength…
Thanks for the article anyway. :o)
Have you had any luck @Benoit or @Teena Gade? I have the exact same problem with my vortex.
I have tacx genius noisy, I tried to calibrate it without wheel and it is very very quite. The noise is for sure about wheel and roller contact..but the epoxy modification seems to be on tacx…is it possibile?
I contacted the customer services and had the part replaced. It stayed quiet for a while and is getting noisier again. Poor design.
Next time I’ll go back to a simpler model from another brand like an elite, with fluid resistance and nothing fancy.
Awesome. This fix sorted my vortex out. Back to training in peace no quiet!
Dorset UK. I have used my iGenius almost every day for just over 5 years. I have a spinal cord injury C3/4, sustained falling off a road bike 6 years ago, so the turbo is a mainstay for my fitness and sanity. The increasing noise problem started about 4 months ago, looked at this epoxy fix, did it last weekend. Brilliant solution; now just as quiet as normal bike road noise.
We drilled out all the holes, using a vacuum cleaner to obviate poly bits, having first masking taped the ventilation slots. Used Araldite Rapid epoxy, mixed in small doses, kept it workable with the careful use of a hairdryer, left any residue apart from the tyre contact area. Tried it out after 24 hrs: puuuurrrrrfect!
You’ve motivated me to try the fix. Maybe next weekend if I can find the tools required. :o)
I was skeptical as I did not observe any symptoms that the metal ring is not reliably fixed. And afraid to spoil the equipment competely. But the noise was hard to bear, and I learned that the new part to replace can easy get for Euro 250 approx. So I decided to undertake the risk. And now I can confirm – it works. My Genius runs guiet as new. I am very thankful for developing and describing this cure.
Ref my Feb. notes. Three months down the line and at least 72 hrs serious pounding, still puuuurfect!
Still working ok Robert?
Oh dear! I am so sorry I didn’t let everyone know of recent developments.
The noise came back about a month ago. I drilled out the resin and applied new Araldite epoxy. Noise gone and still OK. I am quite happy to do this every few months until such time as the repair doesn’t work. Then I’ll fork out several hundred pounds for a new unit.
PS: Isn’t about time TACX solved this problem, as it is not an isolated case? It affects other TACX turbos.
No worries Robert! Yep – it’s just started with my Genius, not even 2 years old. Thanks for the update anyway.
6 Months and still purring!
I’ll have a go with my TACX as it’s close to being as noisy as a plane on take off.
Let us know how you got on. Good luck.
One year and 7000 miles since the last repair. Still as quiet as a mouse.
I knew it was due! Almost 18m to the day the two-stroke bike returned with a vengeance. So drill, Araldite, a steady hand and 24hrs later…..purring again. Another £3-400 saved.
I am currently in the middle of this fix.. waiting for superglue to set before doing next set of holes. But now I see that it’s not a complete fix, and it’ll need to be done more often in future. Do you think a more permanent solution of drilled hole + screwed in screw would be better, and more permanent?
Paul,
I have a couple of years of experience of the noise and the DIY solution. The good news: it works! It is easy to carry out the repair. If you read all my posts. The Anom message before yours is MY latest message.
Paul, sorry I didn’t answer your question. I have considered the screw option, however, it would be impossible to rectify if it doesn’t work, subsequent repairability is unknown, the screws would have to be below the roller surface (the clearance is approx 1 mm.) and do you screw into its plastic inner sleeve or epoxy the screw in place? Has anyone tried it? I know the epoxy repair may need redoing at some stage, but I know it works, is repeatable and only needs doing every 12-18 months or maybe longer. I hope I don’t sound too pompous.
how deep to drill the holes?
Filepe, I reckon just over 0.5 cm. The drill goes in very easily, so you need to be careful. Putting some tape around the drill bit as a gauge might help. I’ve done three repairs in 8 years and not had problems. As long as your epoxy is well ‘tamped in’ there shouldn’t be an issue with it working. I only worry about the CLEARANCE of the rotor and leave any epoxy residue not on the tyre bearing surface, as long as doesn’t impede smooth rotation. Good luck! Let me know how you get on.
Thanks dor the answers. Everything was fine.
It wasnt the best It wasn’t a carpenter termination, but it worked hahaha.
But I think the problems are the vibration ¿How can I try to fix them?
another doubt… Is it possible to move the polyurethane center (with the metal band) to the sides? My wheel has always been close to the holes (tire to the fan side)
I have a Tacx Bushido
Thanks!
Glad it worked for you. I have a TACX Genius, so I can’t comment on the Bushido set up. As long as the tire has an unimpeded surface to drive, no problem. My tire is not central to the roller, but the contact area is fine and the clearance is enough on both sides.
on peux jouer sur la vise de reglage de l’axe mai pas beuacoup
Hello Filipe,
I have an iGenius setup, so I’m not familiar with the Bushido, however, looking at my rotor I think it unlikely that moving or trying to move the metal sleeve is a good idea. I consider there is a good chance of irreparable damage. As long as there is clearance on the tyre contact surface I wouldn’t worry about it. My tyre is not centred on the sleeve, so I just ensure that any glue residue is not in the ‘path’. I hope this helps.
You can generally center the wheel on the metal band somewhat by reversing the skewer in the wheel / frame. Having the quick release on the derailleur side is awkward, but centers the wheel on the roller much better.
Thanks Chris. I’ll give reversing the skewer a go next repair.
Thanks for the detailed post
So glad several folk have had a go. Well, it had to happen! The noise is back: but not yet ‘repair’ level, it’s only a matter of days though. The previous repair was Oct. 2020, so pretty good going: about 8700 miles.
Damn, it didn’t work for me (Satori model). The home trainer still makes a lot of noise when starting up and at medium speed. Faster, the noise fades a bit, but it will end up in the trash…
I’ve just had a look at the SATORI model. The roller is identical to my GENIUS model, so I don’t know the reason for your ‘failure’. Could it be the other rotating part at fault? You could do the repair again. Epoxy resin will do the trick. My posts of 26 Feb 2018/26 May 2020 may be helpful to you. Good luck!
Thank you for your answer, I had followed the method with epoxy glue. I’ll see if another element is vibrating and could be the source of the problem. The mechanism is not easy to dismantle completely. I will look at your other posts.
good luck Neg.
Ah well! It’s that time again. The roller sounds like a jack hammer, so I’ve carried the tried and tested repair. 24 hrs. later sublime quiet. 2.5 yrs. since the last repair.
I also reversed the skew and the tyre is much more centred on the roller.
Kudos for proposing the repair solution. I fixed Genius and later Bushido model. For both fix keeps working for ~1000-2000 km after which I needed to repeat procedure.
Another satisfied money saver!